Tuesday 19 August 2014

Alphonso's base 7 tablas game

 
A game of seven-point tables, using three seven-sided dice and seventeen pieces on each side. 
King Alfonso X the Wise is named as one of the players here. folio 85 verso.


The Libro de los Juegos of Alphonso X 'the Wise' from 1283 contains many medieval board games, both familiar and unfamiliar. The king invented the seven-sided and the eight-sided dice, and with it some games that use these dice. Among the games that use the seven-sided dice are 'The game of the four season called the world', 'Astronomical tables', 'Escaques' (or astrological checkers) and 'Decimal chess'. Alphonso also invented a tablas (backgammon type) game that used the seven-sided dice, which is described in this blogpost.

Making the game board


"Here begins the game of tables and how it is played with seven-sided dice. Now that we have shown you the dice for decimal chess, how they are made, and how they are used as we were saying above to play this chess, we want to show you here and now the game of tables that use these dice.
The board is to be squared with bars around it like the other boards and spaces for the pieces we have already said. In each quarter there are to be seven spaces, because that is the highest value on the dice, for a total of twenty-eight spaces.
The pieces are to be round and the spaces carved out like half-wheels to fit them better. Half of the pieces are to be one colour, the other half the other so they can be distinguished, for at total of 34."

A game board for tablas (backgammon or tric trac like games) is a large board and the 7-based board is an even larger one. As a consequence of their size, backgammon boards were (and are still) folded and usually part of a games box with a chess board on on of their sides. In fact, the name backgammon (back game) might be derived from these game boxes, where tablas is the 'game on the back of the box'. Our 7-based tablas board is no exception to this and has two chess boards on the other side. The reason for having two chess boards is that they can be used to play the medieval game of Rithmomachia. A future blogpost will be dedicated to that intriguing 'battle of numbers' game.

The outside of the games box consists of two chess boards (or one rithmomachia board). 
You can see that the middle bar is of equal width as the edges, but made up of two smaller parts.

Also this medieval game board uses a poplar panel as a base (in fact the poplar panels are all from the same tree). Pear was used for the edges, with a greater thickness of 5 mm for the tablas side. The rim was also twice as big (2 cm) as where the two boards connected (1 cm). When the two parts of the board are open, this would provide a middle bar of the same 2 cm width. The edges were first glued to the board, after which the half moon receptacles for the game pieces were fitted and glued. These half moon receptacles were made by drilling holes with a drill press in 6 mm thick pieces of pear using a 35 mm Forstner bit. The four pieces of pear were then cut at 2/3 along the length to get the half moon receptacles (i.e. the larger parts). The points of the receptacles were rounded with a file.
Pieces of triplex were used to press the half moon receptacles against the edge of the board. Two multiplex boards were used as a sandwich press. As the half moon receptacles were slightly higher than the board edge (~1 mm) only the receptacles were pressed. Afterwards, the receptacle was equalized with a hand plane.

Left:  The two multiplex press boards (for one of the two board parts). Right: The pieces of triplex board used to press the half moon receptacles against the edges.

The two board parts were connected to each other by three brass hinges, with brass nails (and glue) driven into the wood. As the board parts had to be connected without any space between the parts, an angled hinge recess was made to accommodate both the hinge and the pins. 

Left: The angled hinge recess. Right: The folded game box showing one of the chess boards.

Making seven-sided dice has been described in a previous post. As game pieces for the 7-base tablas commercial wooden draughts tablemen were used.

Playing the game

"The pieces are to be round and the spaces carved out like half-wheels to fit them better. Half of the pieces are to be one colour, the other half the other so they can be distinguished, for at total of 34. Seventeen of one colour and seventeen of another, so that if you put two pieces on each point of a quadrant, there are three left over to play or enliven the game because without them it could not be done. [i.e. 15 = 6x2 +3 for normal tablas and 17 = 7x2 +3 for the base 7 tablas] This is why the pieces are paired because as in this game of chess which a piece is found all alone away from the other pieces without anyone to guard it and it can be taken, it is taken as we said before.

Also in this game of tables if they are not doubled up as we said, the other player who throws dice that correspond to that space is to capture it since there is no one to defend it.
And the prime is one player takes so many of the other’s pieces that he then does not have spaces to enter them, he wins the game."

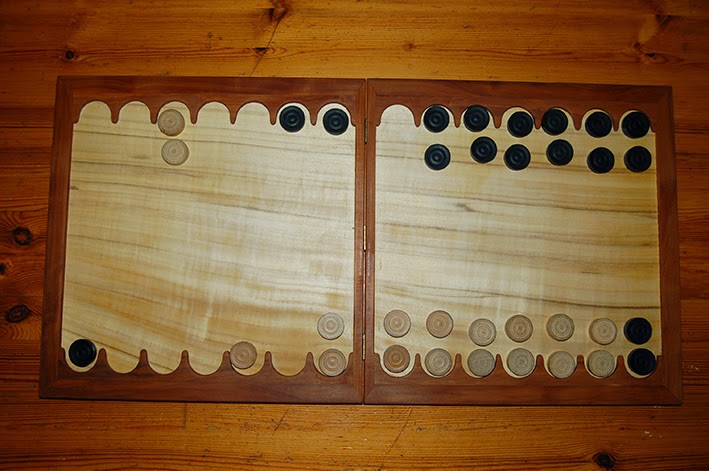
The starting position of the game of 'diecisiete tablas' as shown on folio 85v, now on our pear and poplar tablas board.

For the 6-based tablas the following is added, which also will apply for the 7-based tablas:
"And tying is that even if he has very few pieces and he enters them that neither one can play even if he wishes. Whence also for the prime because without these three pieces which are in addition to the first twelve [or fourteen for the base-7 tablas], it could not be done."

 The game of quinze tablas [fifteen pieces], folio 73v.

The base-7 tablas game shown above on folio 85v and our game board is an expanded version of 'quinze tablas' on folio 73 of the Libro de los Juegos, and could be named 'diecisiete tablas' [seventeen pieces]. It uses the same rules, and the same amount of dice. But instead of three six-sided dice, three seven-sided dice are used. 

According to Sonja Musser, quinze tablas could be an extremely simple game in which the pieces do not cross paths but both players race, first to move all their men into their respective inner tables and then to bear them off. I think this is very unlikely, as King Alphonso X (the Wise!) would certainly not be associated in an illumination (folio 85v) with such a simple game. The other option she presents is a game of contrary motion, a view that is shared by both H.R.J. Murray and David Parlett. Pieces should be beared off from the quarter of the table where the other player began. Single (odd) game pieces can be captured, and must be re-entered from their original starting quarter of the table.

 Movement of the pieces on the board. White follows the red arrow, black the black arrow.

I think that this game should be played differently. The seventeen (or fifteen) pieces of the starting position should be moved to a similar (double) position on the opposite side (i.e. not bearing them off) in order to block the entry points of the captured pieces of the other player.* During movement from one side to the other (via the other quarters of the board), single game pieces are vulnerable to capture by the other player. Captured pieces must be entered again at the starting quarter. If a player cannot do so, because all the possibilities are blocked by the opposite colour, he loses the game. This type of play also explains the occurrence of having a tie, when both players block each other, and the need of more tablemen than fourteen (or twelve). A maximum of two pieces (a double) can be in a half-moon slot (i.e. not three or more as in other tablas games).
Presumably, die rolls that can not be used are lost.

* Which also explains the second sentence of quinze tablas (folio 73): "The first game of tables is this one that they call fifteen pieces or six [double rows, i.e. the blockade] and however many they can place there from fifteen to one."

Black wins. White cannot enter its two captured game pieces as its quarter is 
fully occupied by double black game pieces.

Two versions of a draw. Left: Black cannot move in, as the position is blocked by white, which cannot move out of the black blockade. Right: Both white and black pieces cannot leap over the other colour, as they would need a roll of 8 (seven being the maximum on the die).


The Libro de los Juegos concludes on the 7-base tablas game by mentioning that all the normal base-6 tablas games can be played as well on the board, with the extra game pieces added and using seven-sided dice.

"On this board for tables can be played all the games for the other board which uses six-sided dice, as we said above, noting that on a six-sided die six is the highest roll and on the dice of great chess eight is the highest, that on these dice seven is the highest. And that with higher or lower rolls any moves can be made according to the roll of the dice.
This is the explanation of this game and the diagram of its arrangement and how the Emperor [i.e. Alfonso himself] plays on this board and therefore his figure has been shown here.

Sources:

  • H.R.J. Murray, 1952. A history of board games other than chess. Clarendon Press, Oxford, UK.
  • S. Musser Golladay, 2007. Los Libros de Acedrex Dados e Tablas: Historical, artistic and metaphysical dimensions of Alfonso X's book of games. PhD Thesis, University of Arizona, USA.
  • S. Musser Golladay, 2007. English translation of Alfonso X's book of games.
  • D. Parlett, 1992. The Oxford history of board games. Oxford University Press, Oxford, UK. 

Sunday 17 August 2014

The sella curulis: the final touch

The finished sella curulis when folded.


With all the separate pieces of the sella curulis finished, there was one thing left to do: join all the parts and make the chair out of it! First, all the wooden parts were finished with linseed oil. Then I added some metal chair sliders to the feet. These sliders allow for easy movement of a chair over a floor surface, but more important they lifted the feet a few mm above the ground. As the gilding of the claws also went partly under the feet, this would protect the gold from being scratched away.

The metal chair slides have three metal pins that are driven into the wood. You cannot hit the slides with a metal hammer as this will dent your sliding surface.

Two views of the chair slides on the feet of the sella curulis.

The parts of the sella curulis are joined with mortise-tenon joints. These are in turn fixed with wooden pins. The pins were also made from pear using the 6 mm hole in the dowel plate. For each mortise-tenon for the rail two short pins were needed (8 in total), but for the X tenon really long dowels were needed, around 9 cm long. Using pins is generally enough to fix a joint, and normally I do not use glue for these joints. But this time I wanted to be sure it stayed fixed, so I added a 2-component wood glue to the joints. After the glue had dried, the holes for the pins were drilled and they were driven in. 


Left: The clamped and glued sella curulis. Right: The glue was applied very carefully in the mortises.

Above left: The long pins for the X mortise. The other photos show the pinning process of the seating rail. The chair was upside down and rested on blocks covered with towels to protect the gilding of the eagle heads.

The holes for the pins of the X mortise were already pre-drilled on a drill press, because the margin to drill the hole in the mortise and tenon was very tight. A slight deviation in the angle of a hand-held drill could compromise the folding capability of the chair. The pre-drilled holes served as a guide to drill the hole through the X tenon after glueing. When making 6 mm pins, the holes are made slightly smaller (5.8-5.9 mm), so they pins will stay fixed. For a 9 cm long pin this is not feasible, as the pin will likely break during the repeated hitting with a hammer. The pin has to go into the hole more easily, so also here a 6 mm hole was used with a little drop of glue to keep the pin in.

Left: the pre-drilled hole in the X mortise. Right: the pin in its place.

The pin driven in. You can see that the head of the pin is staring to split due to the repeated hammering. The eagle heads rest on towels for protection.


Yes, it is finished!

 Two more photos of the finished sella curulis.

 
Finishing the medieval folding chair also meant that I had to clean up all the mess  in the workshop. 
In the upper left corner you can see another project on its way.

Monday 11 August 2014

The leather seat of the sella curulis

Although adding a leather seat to the sella curulis seemed an easy task at first, it was rather more complicated. Not in the first place because I made several mistakes which had to be redone before the leather seating finally could be attached. The seating problem started with the question of how these seats originally were attached. The images of the extant pieces were of not much help as the attachment of the leather is not seen when they are shown at their best angle. The faldisorium of the Nonnberg convent had the leather between two wooden rails. Was the leather clamped between these rails? Was the leather folded at the end, so that it could not retract between the rails? Or was the leather nailed to the lower rail and served the upper rail only for decorative purposes?  One of the two folding chairs of the Museum für Angewandte Kunst in Vienna showed some nails. But how many were used and how were they attached? There were simply too much unknown factors to start straight away. 

The sella curulis from the Stift Nonnberg, Salzburg, Austria. The leather goes between a decorative upper rail and a smaller lower rail. 

Seating detail of the 15th century folding chair from Stift Admont, Austria, now in the MAK, Vienna. On the right side you see that the leather is folded over the rail and then nailed to it (red arrows) with at least seven nails. The leather seating itself is folded at the edge and sewed (green arrow), providing a more comfortable seating.


The solution was just to ask. The curator responsible of the furniture and wooden objects of the MAK, Herr Sebastian Hackenschmidt, was kind enough to answer my questions and he send me some detailed photos of the leather attachment. The leather of the seating consisted of two pieces, sewn on top of each other and nailed to the connecting rails. The the method of nailing was clearly visible on the photos. The points of the nails were bent and then hammered back into the wood. Nine nails were used to attach the leather to each rail. Herr Hackenschmidt also noted that the (bottom) rails containing the arms of abbot Johann von Trautmannsdorff (who headed the cloister from 1466 to 1481) to the two legs were an addition of the 15th century. Possibly before that time a connecting rail used to exist at the X-point, which was weakened and replaced by new bottom rails and some iron reinforcements inside at the X.

Inside of the seating rail of the 13th century sella curulis from the stift Admont, Austria, now in the MAK, Vienna.  Eight nails can be counted, the ninth is hidden behind the leg. Note that the leather of the seating is double and used to be sewn together (the sewing holes can still be seen). You can also see that the inside of the joint for the legs is reinforced with an iron rail. Photo kindly supplied by S. Hackenschmidt, copyright MAK, Vienna.

The outside of the same seating rail. Seven of the nine nails can be seen. At the side the double leather of the seating is folded over. Photo kindly supplied by S. Hackenschmidt, copyright MAK, Vienna.

The leather

I am lucky that my neighbour (Gelderse Roos) makes historic shoes (and costumes), which means that it was rather easy to acquire leather for the seating. They did have a piece of old leather that had been used for seating, approximately 2 mm thick. First, the leather was cut to width. The wooden rails have a width of 32 cm, so the width of the leather including two 1.5 cm folds was set to 35 cm. As I wanted the leather to be coloured black, to fit with the back and golden eagle heads, my first task was to clean it of any oily substances of its previous chair life with acetone.

The piece of old seating leather I started with.

 
The shiny leather look is gone after applying an acetone treatment. 
The rag has become brownish from the dirt of the leather.

Then the leather was cut to width. The wooden rails had a width of 32 cm, so the width of the leather including two 1.5 cm folds was 35 cm. The edges of the leather were pared (bevelled) to make the folds thinner, using a leather skiving machine. During medieval times this was done with a very sharp skiving knife. The technique how to pare leather manually is shown in this youtube film.

My neighbour at work with the skiving machine. It has a razor-sharp knife set at a fixed bevel and a rotating wheel that presses and moves the leather along the knife. On the right photo you can see the line of leather that has been cut away.

Two more images of the skiving machine and at the bottom the results: the pared leather for the seating with a chamfered edge and the thin lines of leather that were removed.

With the leather pared to a bevel, it had to be coloured black. For a thorough black colour my neighbour recommended the alcohol based black leather paint of La Industrial. The paint was lavishly applied several times to both sides of the leather. The whole working place stank for a week of the fumes from the paint, but the result was a nice black coloured leather.

There is also a more 'authentic medieval' way to colour your leather black. In fact, if I had known it (and not just as I type this text) I would have tried it, as the recipe seems quite easy. To quote Toki Medieval:
"To dye leather black, you need acid, iron, and a tannin, just as you do when creating black ink. The leather has already got  tannin in it from the tanning process and simply dyeing in an iron pot would provide the iron, just as dyeing weld in an iron pot produces green instead of yellow.
The purpose of the acid is effectively to rust the iron, however, so rather than damage a pot I soaked iron wire in a vinegar solution in a glass dish, and then submerged the leather in it. The impact on the leather was rapid: within an hour it was already turning a blue-grey. It dyed best when floating just below the surface of the water, presumably because it was more exposed to the air. Where layers of leather overlapped, the lower layer didn’t dye as well.
I took it out after two weeks as if you leave it in too long, the acid will eat away at the leather, causing it to decay. At this point it was a deep blue-black which, after oiling, came up as the intense black shown below. Unlike with a modern dye, iron and vinegar turned the leather black right through, rather than just the surface.
"


 The leather painting process. The paint was soaked through the leather. Right: the black paint bottle.

With the black leather dry, the next step was to fold the edges and sew them. Actually, it is better to fix the paint first with a satin finishing mixture (explained later), as it will keep your hands clean, instead of black from the dried remnants of paint. Also it will keeps your sewing thread clean, instead of becoming greyish. First, we applied some leather glue (to make the sewing process easier), the leather was folded and hammered flat with a shoemakers hammer. Then the edges were sewn using a Rafflenbeul shoe sole stitching machine (a renowned high quality leather-working machine). It uses waxed linen thread, which is slightly pre-warmed by the machine for smooth stitching.


 Applying glue and folding the edges of the leather.

My neighbour is flattening the fold with a shoe-hammer on a wooden block.


My neighbour at work sewing the leather seating. Although the Rafflenbeul can be used fully automatically, it is more precisely controlled when moved by a hand wheel.


Then, I discovered my first mistake. The fold also added a few mm to the width of the seating, so my final width was not 32 cm, but 33 cm! This was too wide to fit on the wooden rails, and the stitching of one side had to be removed, the width adjusted, bevelled again, folded again and sewn again. The result was not as nice as the first go, but still acceptable.

The leather was then finished with a water-resistant coat from Eco-Flo. This is a modern acrylic finish that protects the leather against stains and provides a nice satin finish. It also protect the person seating on it from any black stains from the leather. When applied earlier it would have given a clean stitch. The coat was applied with a wet sponge, and after drying 14 hours, a second coat was applied, and after drying the leather was buffed with a soft cloth. Both the front and back-side of the leather received the finish. I also tested other finishing coats, such as leather oil and leather wax, but this did not give satisfying results with the painted leather.

 The coat had to be applied with a wetted sponge in long even strokes.

Finally, I thought that a gold thread was perhaps better suited than a linen thread. As a result, I painted the visible parts of the stitched linen thread with gold paint. Ideally, I should have used gold thread for (hand) sewing.

The leather with white stitching (left) and golden stitching (right). Actually, this is the third leather seating.

Here the difference between the plain sewing thread and the gold painted one is shown.

The nails 

As shown on the original faldistorium from the MAK in Vienna, the leather is nailed to the rail and the nails are hammered back into the wood. The MAK folding chair has nine nails per side. I tested the space between the nails on a piece of leather to find an aesthetically pleasing spacing and also ended up with nine nails per side... 


The three nails on the left are too close together, the space between the two right nails is more pleasing to the eye.

The nails have to be thin enough in order to be able to bend back into the wood. Otherwise they would either break or demolish the wood. My (machine)-forged 4 cm long nails were too thick (3 mm square) to bend and had to be made thinner. I created a wooden jig to be able to file the nails to half their thickness - at the part that was to be bended. The jig ensured that I did not had to hold the nails by hand, that they were correctly positioned for filing, that two nails could be filed at the same time, and that the nail length to be filed could be adjusted. Quite much for a scrap piece of wood with two holes in it. 


A hole slightly smaller that the nail is drilled through the wood (left photo, most left hole), and the nail is hammered through it and pulled out. A tight fitting square hole is left (left photo, middle holes) where the nails can be pushed through at the appropriate length (right photo).

The jig is set into a vice. Two nails can be filed at the same time.

Some filed unpolished nails.

After filing, the nail points were resharpened (also with the file). Next, the filed surface of the nails was sanded with 120, 180 and 400 grid paper. The nail heads also needed to be gilded. Gilding nail heads (of gilding eagle heads) has the advantage that you can push you nails on the gold leaf, instead of otherwise. This makes gilding an easy process. I used Indian 24 carat gold leaf, which is sold (relatively) cheap in booklets of 100 loose leaves on internet. The leaves were cut in four and placed on a foam mat. The nail head was glued with super-glue and then pressed onto the gold leaf. The edges of the gold leaf were folded over with help of a brush. The process was repeated, so each nail head had two layers of gold. Reason for me to use super-glue and two gold layers was that I expected quite some force on the heads during hammering of the nails.

The nail head gilding process: the foam layer allows to press the gold leaf against the nail head, without damaging the ultra thin gold leaf.

 A batch of gilded nails.


Nail heads can also be 'gilded' by pressing a glued head into bronze powder.   


Construction

At this point I tested the length of the leather for the seating, to be sure nothing went wrong with the size. But then the inexplicable happened, I cut it the wrong size and the length was about 9 cm too short. I had to redo the whole leather seating. This time new saddle leather was used, which did not need the acetone treatment. (Alas, we did a miscalculation here as well, so we had to cut a third piece of leather. Luckily, we discovered this before we did anything else with it). Also the finishing coat was applied earlier, resulting in a clean stitching. Another improvement was to pre-fold the edge when the leather was wet with the black paint. Leather, especially thick and stiff saddle leather, is easier pliable when wet. With the edges folded the seating had a width of 32.5 cm.

Testing of the length of the leather seating on the sella curulis with an expendable piece of leather. Some spruce rails were used and the leather was stapled onto the rail. You can see the extra leather hanging over the right rail.

The leather had to be folded over the complete rail, such that the edge was hidden from view (unlike the two sella curulis in the MAK in Vienna). Also here I tested the attachment first with some spare nails and a scrap piece of leather.


The back and front of the nailing test.

For the attachment first 3 mm holes were drilled in the wood of the rail at the places where the nails would be placed. A modern nail was used to transfer the location of the holes onto the leather. The dips left in the leather by the modern nails were punched through with a leather punch or a revolver punch pliers. The wooden rails were also finished with linseed oil, except for the tenons, before the leather was attached.

Transferring the position of the holes in the rail onto the leather using modern nails.
 Two rows of punched holes for the gilded nails.
The two rails on top of the leather. The pieces of leather on the left and right are to be folded over the rail.


Then the gilded nail was pushed through the leather, the hole in the rail and again through the leather. The nail-head was pressed flat against the leather with help of another simple jig. This consisted of a wooden block with a hole drilled in it. The hole was placed over the nail point and hammering on the wooden block pressed the leather and the nail flat. For protection of the gilded nail head, a piece of scrap leather was placed beneath it.

  Left: Another simple jig: a wooden block with a hole drilled in it. Right: Here the block with the hole is set over a protruding gilded nail. A piece of scrap leather protects the gilded nail head.

The protruding nail point was bended at 90 degrees with help of pliers, before being hammered down back into the wood. Now only the sella curulis parts have to be put together and the chair will be finished. But that will be a topic of a next blog post.

Left: the bent nail. Right: four of the nails hammered back into the wood.


The finished seating, with all 18 gilded nails.


The inside (left) and the outside (right) of the seating rail, with 8 gilded nails.

 
The finished seating of the sella curulis. You can see that the saddle leather is stiffer than the leather of the 'first seating attempt', and is tilted slightly upward. This will improve when the chair is in use.