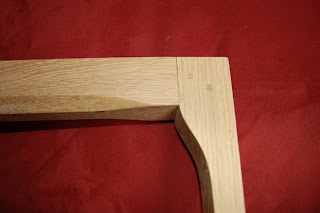
This post continues the tale of the making of the strycsitten. After the test with the pine model and carving the oak panels and 'traingle' supports I continued by making the frame of the strycsitten in European oak. This is rather straightforward work: oak beams are planed to their appropriate thickness; mortises are cut using a mortising tool and the corresponding tenons sawn by hand.
Using the mortising tool in the workshop
The next step is to cut the grooves for the support triangles and the panels. The main work here was done with a router table and finished by hand with chisel and router plane. Then the holes for the dowels (for the mortise and tenon joints) were drilled. These holes are slightly smaller (5.9 mm) than the dowels (6.0 mm) to provide a tight fit. Furthermore the dowel-hole is first drilled in the frame but without the tenon in it. The tenon dowel-hole in is drilled separately and slightly closer (~1 mm) to pull the two parts of the frame together (see image below).
When all dowel-holes were drilled, the panels and triangles were fitted in the grooves and everything was fixed by hammering in the dowels.The frame was then finished with three layers of linseed oil.
After the frame was completed the seating board had to be added. The seating was made of two oak boards which were connected with a loose tongue and groove joint. As wood works, the loose tongue and groove joint allows the seating boards to expand to the middle. The seating boards were finished with linseed oil before they were fixed to the frame at one end with a dowel.
In each corner a dowel was used to fix the seating board to the frame.
This restricted the wood to expand to the outside, but allowed it to expand to the middle of the seating.
The loose tongue and groove joint was wide enough to allow for expansion of the seating boards (small double arrow). There is also space around the middle style (shown by the two long arrows).
Next, the backrest of the strycsitten was made. The backrest consists of a square beam, which is chamfered at 45 degrees in two of the corners along the length of the beam. This removes the square edge which would otherwise point in your back. The large chamfer makes the backrest really comfortable to rest against. The backrest was secured to the arm parts of the backrest with two dowels. The completed backrest was finished with three layers of linseed oil before at was attached to the strycsitten.
The completed backrest - the same size as our modern sofa.
The hole for the turning point can be seen in the arm part of the backrest.
Detail of the backrest. Two dowels secure the parts of the backrest.
Note that the chamfering is not done at the backside.
Finally, the completed backrest was attached to the armrests of the strycsitten. I used a 12 mm wooden dowel with wooden buttons as the turning point for the backrest. An iron rod is often used for strycsittens as a turning point (e.g in the strycsitten of the Rijksmuseum Amsterdam or the Loevesteijn replica). I did not want to use iron: it reacts with oak, I would have needed a blacksmith to make it, and a wooden is strong enough and can easily be replaced if necessary. The wooden buttons were made with a tenon cutter, the button-hole was drilled using a forstner bit and the button was rounded with a belt sander. Attaching the wooden buttons to the dowel was the only point in the construction where glue was used. However, I used a skin-based glue, which was also available to the medieval woodworker.
Dowels used for securing the mortise and tenons, and the turning point dowel with the oak buttons.
The turning point dowel attaching the backrest to the frame of the strycsitten.
The strycsitten itself was already finished early in February. Only one part remained to be done (which is also finished now): the footrest. However this will be the subject of another post. Two images of our completed strycsitten are shown below.
The completed strycsitten - with footrest.


